Roasted Fennel Soup
January 18, 2016 § 6 Comments

Hello everyone, sorry for the absence! Here it is the middle of January already. The days are flying by no matter how hard I try to live in the moment and all that.
I had a lot of recipes I was planning on writing about today but these days it’s all about soup. I find soup making so easy that I’ve always got a big pot of something going. Even a cup of steaming chicken broth helps take the chill off. Sometimes I’ll toss in some fresh parsley or add some of last nights veggies but usually it’s just plain broth.
Always on the lookout for soup ingredients I came home with 2 nice large fennel bulbs. I love fennel when it’s cooked. Raw not so much. A bit overpowering for me. Sambuca, no thank you.
When you cook fennel aka anise, it’s strong flavor mellows and becomes almost sweet. I like roasting it, cut into chunks, alongside root vegetables in a hot oven, tossed with just olive oil and salt and pepper. Or cut in half and tucked under a whole chicken or pork roast. This gratin, made with cream and garlic is my absolute favorite way to eat it.
So back to soup. Simple being my motto, how to make a simple fennel soup? Cut it up, toss with some onions and olive oil and roast. When done, add some stock then puree. Add some cream if you wish. And that is it. Almost doesn’t need a recipe it’s so easy.

Ingredients:
1 large fennel bulb, fronds cut off and hard core removed
1 large onion
2 to 3 TBL olive oil
1/4 tsp salt, 1/8 tsp pepper
about 3 1/2 cups vegetable, beef or chicken stock
orange zest, fresh thyme
Preheat oven to 400 degrees. Lightly grease a baking pan. I like to use one with sides, keeps the vegetables a bit moister I find.
Coarsely chop the fennel and onion. Toss with the olive oil, salt and pepper. Roast between 30 and 45 minutes until very tender, tossing occasionally.
When the vegetables are done put them into a good size pot and add the stock. Bring to a boil, the simmer 10 to 15 minutes to meld the flavors.
Pour about 1/4 of this into a blender or food processor. Be very careful when pureeing hot liquids, only do small amounts at a time and cover the top with a kitchen towel. Puree for 10 seconds each time to really break up the vegetables and give it a creamy consistency.
Pour it all back into the soup pot. If you’re a cream lover like me you can now add some fresh heavy cream or half and half. Doesn’t need much, maybe a few tablespoons. Taste for seasoning.
To finish, grate a little orange zest on top and sprinkle with some fresh thyme leaves. Toast a good hearty piece of bread, topped with a slice of gruyere or cheddar and once it’s in your bowl (ovenproof) place under the broiler for a few seconds. Keep your eyes on it, it can burn quickly. Or just grate some cheese on top if you don’t want the bread.

Happy Winter!
One More Winter Meal
March 23, 2015 § 2 Comments

As much as I love cold weather comfort foods, the season for hearty stews and soups is coming to an end. Rhubarb appearing in my dreams, cravings for all things green, edible or not, have started.
We had a few of what I consider warm days….40 degrees and no wind chill and those were enough for me to want to pack up my casseroles, open all the windows and start digging for dirt.
Then today, a reminder that spring is still not as close as I thought. More comfort food for a little while longer I guess.
Here then is one more hearty meal to make it through until spring really does arrive.
Pot roast is one of my staples in the arctic months, and so easy to make. Just spend a little time browning the meat and cutting onions and the oven does the rest. If you make enough you can have leftovers and hot pot roast and gravy sandwiches for a few days as well. I suggest making this a day ahead, it’s so much more flavorful after a day or two.
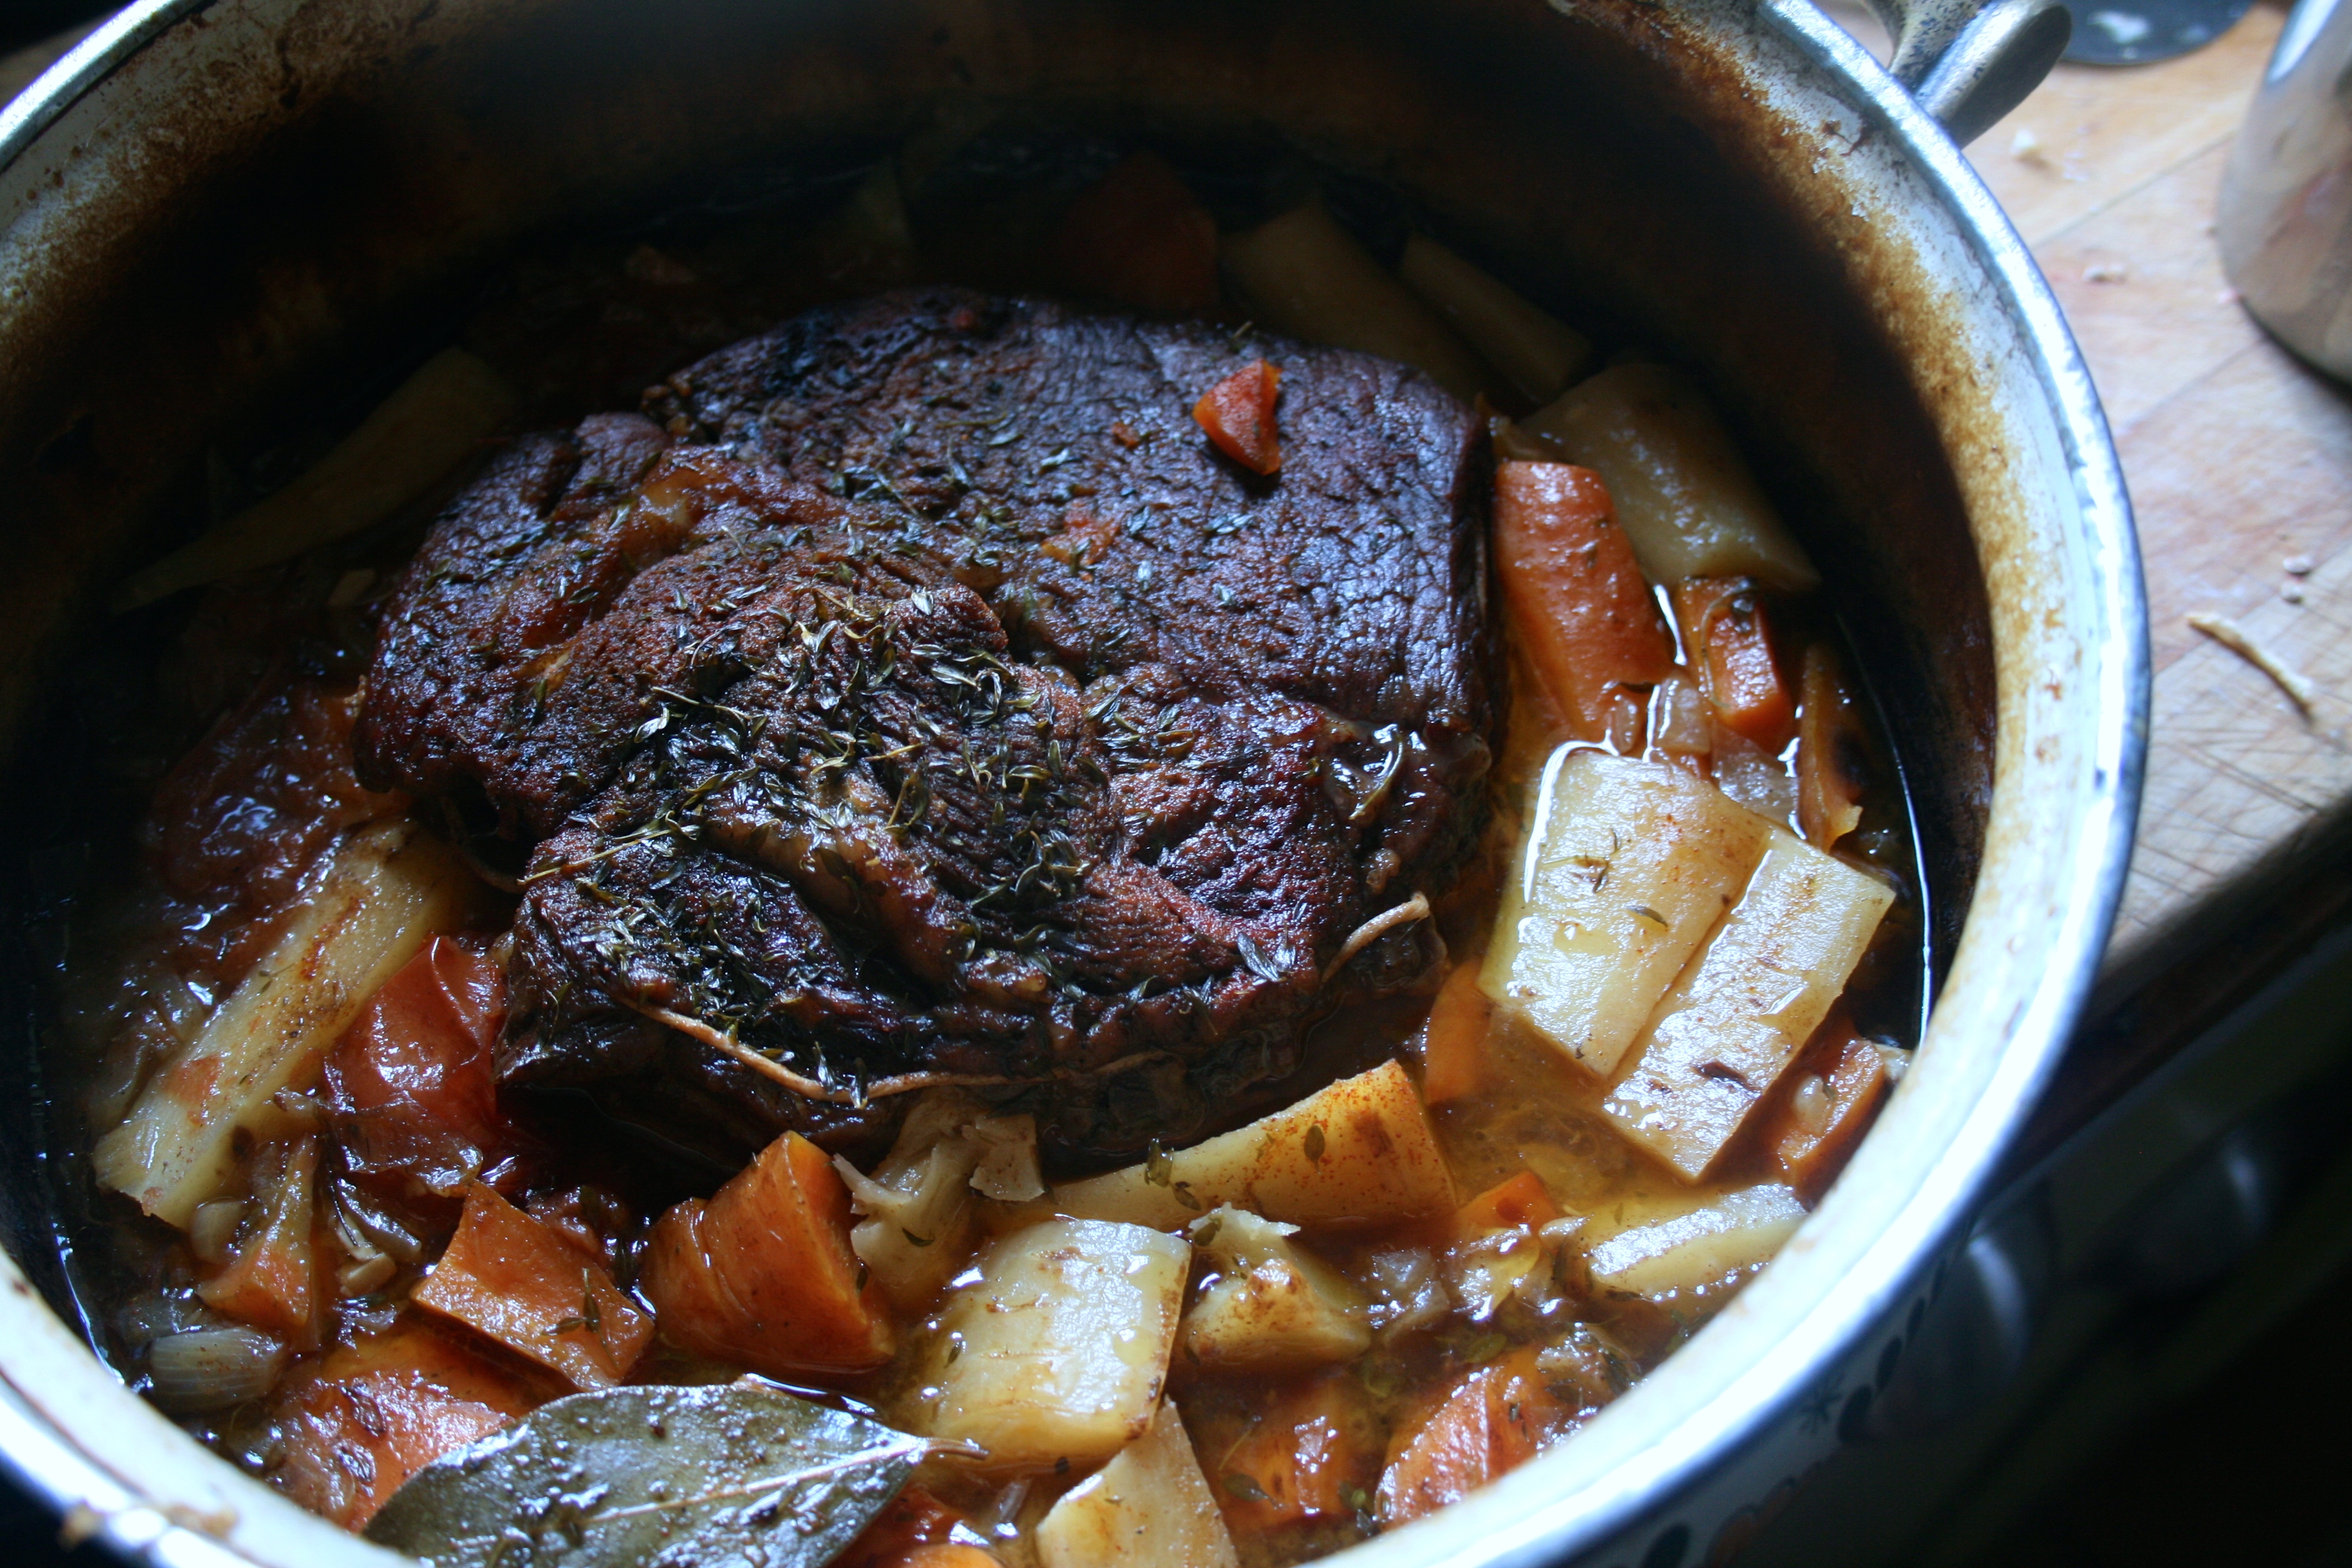
Braised Pot Roast with Carrots and Parsnips
Beef chuck roast, about 3 to 4 lbs
fat for browning, 2 or 3 TBL
good salt and pepper
1 bay leaf
thyme or oregano (a few sprigs) or dried (1 TBL)
1 large onion, chopped
2 carrots, cut into large chunks
2 parsnips, cut into large chunks
1 clove garlic, smashed
2 cups red wine
2 to 3 cups beef or vegetable stock
Preheat oven to 325 degrees.
Season the roast well with salt and pepper. In a large casserole or Dutch oven, heat fat (bacon fat, lard, olive oil) until very hot and brown the roast well on all sides. Remove to a plate.
Add the chopped onion, garlic, carrots, parsnips and bay leaf to the fat remaining (add more if you need to) and sauté about 5 minutes until vegetables are well coated and softened.
Add wine and bring everything to a boil, stirring up all the bits on the bottom.
Return the roast to the pot, add the broth and herbs. Make sure the liquid comes halfway up the roast, add water or more stock if needed. When simmering again, cover and bake about 2 hours, until meat is very tender.
To make gravy, remove the meat, all but 1 of the carrots, parsnips and bay leaf. Keep warm.
Carefully puree the liquid in a blender, a few cups at a time. Please be careful, hot liquids in blenders can become dangerous if filled too high. Blending the liquid with some vegetables will thicken the sauce without having to add any of the usual thickeners like flour or arrowroot. Taste and adjust seasonings.
Return the meat, vegetables and sauce to the pot and keep warm until it’s time to eat.
You can cut the roast into large chunks or shred with 2 forks. Serve with mashed or boiled potatoes and pour sauce over all.
I like to serve this with applesauce, which if you don’t have can be made while the roast is cooking.
Happy Spring!

illustration by me
Scrambled Egg Muffins
July 12, 2014 § Leave a comment


Breakfast can be a challenge for me sometimes. I have a piece of bacon or sausage and some fruit, like melon, or a bowl of strawberries with some fresh cream poured over, and a cup of coffee. In winter it’s usually oatmeal, again with fruit, maple syrup and cream. Of course eggs are in there too, but today I got tired of the over-easy version and got a little creative.
I love a muffin in the morning, but I try to avoid flour if I can. And I’m not a fan of gluten free flours really, I don’t think some of the substitutes are all that healthy…. so this is basically an egg beaten with salt and pepper and poured into a muffin tin. Pretty simple!
I added quite a few things to the “recipe”- whatever I had in the fridge really….leftover broccoli, chopped kale, a few cherry tomatoes and of course cheese. Gotta have cheese – pretty much on everything!
So give these a try, they are great for anytime you want a snack, packed in lunch boxes and for traveling, and of course breakfast, still warm from the oven.
Here’s the “recipe”
12 eggs, one for each muffin cup
salt and pepper
vegetables, either left over of fresh
goat cheese, cheddar, feta, Parmesan-as much or little as you like-I used a heaping TBL on top of each one.
Pine nuts or any type of seed, sesame or pumpkin, etc.
Minced garlic, fresh herbs

Preheat oven to 350 degrees.
Grease a 12 cup muffin tin or line with paper liners.
Beat the eggs. If you’re making different kinds, I suggest separating some of the eggs into different bowls for the different ingredients ( like 2 eggs with kale and cheddar, and 2 eggs with tomatoes, broccoli and goat cheese, etc. I find it easier to pour into the cups this way). Or just beat them all at once, then add the veggies.
Add salt and pepper to taste, remembering if you add cheese it may be salty already.
Add the veggies, then sprinkle on the cheese and seeds, etc.
Pour into muffin tin and bake about 30 minutes until knife inserted comes out clean.
And that’s it. You can get creative here, of course, add some cooked bacon, a little cooked sausage, some sun dried tomatoes, herbs, pretty much anything goes!

Making your own Nut Butters
June 12, 2014 § 2 Comments

It’s pretty much the easiest thing in the world to do. Put nuts in food processor and turn on.
You’ll know exactly what’s in it, and what’s not: bad things like hydrogenated oils, sugar, (do we really need sugar in everything?) and preservatives. And organic nut butters are expensive I’m sure you know!
It would be a good thing if people started making foods like this from scratch. Picking up a jar of peanut butter from the store is easier, sure, but seriously, home cooking is where health starts. Do we really not have that extra 10 minutes? Besides, there is something rewarding about taking a batch of nuts and turning them into smooth and creamy butter. Really, it’s true. Only 3 requirements: a food processor, some nuts and time. Usually about 10 minutes from start to finish, depending on your food processor. You could make this in a Vitamix too, I don’t have one so I’ve never tried it.
And the taste is so fresh, and much “nuttier” is how I would describe it.
Here are a few “recipes” to get you started!

Basic Peanut Butter
Take 3 cups roasted, unsalted organic* peanuts and put in food processor. Use the steel blade.
Start processing. After a minute or so, stop engine and scrape. Resume.
Nuts will go through several stages, from coarsely ground, to finely ground, to clumpy.
You may have to scrape the sides occasionally, then keep going and you’ll see it start to turn creamy.
After about 3 to 4 minutes you’ll have the best, smoothest, nuttiest peanut butter you’ve ever tasted!
If you want it a bit chunkier, add a few peanuts at the end.
Almond Butter
3 cups raw organic almonds
1/2 tsp sea salt
Process as above, adding salt at the end
Coconut Almond Cashew Butter
1 cup almonds
1 cup cashews
1/2 cup walnuts or pecans
1/2 cup unsweetened coconut flakes
1 to 2 TBL melted coconut oil
Add all nuts and coconut flakes to food processor and process until nuts turn creamy, scraping down sides occasionally. Add coconut oil at the end.
Store all in refrigerator when done.
You can roast the nuts in all these butters, to concentrate the nutty flavor. A 300 degree oven for 10 minutes on a cookie sheet. Let cool before processing. Try adding some extras, like chocolate chips, coconut flakes, cinnamon, a little bit of maple syrup or honey, raisins. Add at the end and stir in with a spoon.
And experiment with different nut combinations too. Throw a few peanuts into the almond butter, or pistachios into the peanut butter. Or try sunflower or pumpkin seeds stirred in for an extra flavor and nutritional boost. You really will wonder why you haven’t been doing this all along!

*peanuts are one of the most carcinogenic and pesticide laden things you can eat
Braised Rabbit with Bacon and Sour Cream
April 18, 2014 § Leave a comment

Most likely you’ve got your Easter meal planned already but in case you haven’t and are looking for something a little different, how about rabbit? Easter and rabbits are somewhat synonymous aren’t they?
It was hard to find rabbit anywhere not that long ago. Only farmers and the European cultures knew what a tasty and healthy food rabbit was. I remember my grandmother and her rabbits. She raised them for her food, like the chickens and ducks. And she would use every part of every animal, making sausage and stocks. Luckily now you don’t have to raise them, you can buy rabbit in major supermarkets and order online as well.
True peasant food, it’s a very lean, delicious meat that needs some fat in the cooking process. And bacon and rabbit go together like, well Easter and eggs. Though there’s not much that bacon doesn’t go well with! It’s even in chocolate now, a brilliant combination I think!
I love to braise meat and rabbit cooked this way comes out moist and tender. Simply start the process on top of the stove then put it in a hot oven to finish. A side dish of asparagus and boiled potatoes to soak up the sour cream sauce would make a wonderful Easter dinner. And it’s so simple, the way I like to cook.
Ingredients:
1 whole rabbit cut up
1 onion, chopped
2 or 3 slices of bacon, chopped
chicken stock, about 1 to 2 cups
salt, pepper, paprika
1 cup white wine
large scoop of sour cream


Preheat the oven to 375 degrees.
Salt and pepper the rabbit.
In a large saucepan over medium heat, cook the bacon and onions until soft. Remove with a slotted spoon and set aside.
If you don’t have enough fat to brown the rabbit add some olive oil to the pan, about 3 to 4 TBL.
Turn the heat up high and add the rabbit pieces. Brown well.
After you finish browning, add the chicken stock so that the rabbit is submerged in it.
Return the bacon and onion to the pan. Sprinkle liberally with paprika.
Bring to a boil then cover tightly and put in the preheated oven.
Bake until tender, about 1 to 1 1/2 hours. Check occasionally to make sure the liquid hasn’t boiled away. Add more stock if necessary.
When done, remove rabbit to a warm plate, cover with foil while you make the sauce.
Turn the heat to high. You should still have some liquid in the pan, if not, add more to the pan. Add the wine, then bring to a boil and boil a few minutes, stirring up all the good stuff on the bottom of the pan.
Turn off heat. At this point you can puree the liquid in a blender if you want (be careful with hot liquid!) Or if you like a chunky sauce, don’t.
Stir in the sour cream, taste for seasoning.
Return the rabbit and the juices on the plate back to the pan. Let it sit for a few minutes.
Serve with potatoes or a side dish to your liking, or just a vegetable. Applesauce or cranberry sauce goes well with this.

Enjoy and Happy Easter!
Rustic Cabbage, Ham and Potato Soup
January 8, 2014 § 10 Comments


I feel like I live in Antarctica. Deep snow and ice everywhere. Frigid temps. Below zero nights and days which is unusual even for Vermont. We are in what’s called a “polar vortex”, kind of a scary sounding term I think. I keep expecting to see some penguins come marching up the road any day now!
This weather is soup weather alright, and I’ve been making some every day for lunch. Might start having it for breakfast too. Yesterday I made some for dinner. I had some ham left over from a delicious smoked ham that came from Sleeping Dog Farm in nearby Wilmington, Vermont. Their beef and pork is pasture raised from heritage breeds and so delicious.

Anyway I had some of this delicious ham left over, after making dinners and lunches and of course split pea soup with the bone. I just used a few ingredients, potatoes, cabbage and the ham, you don’t need more. If you don’t have any ham you can easily substitute bacon, the thicker cut the better. Try to get the ham in one big piece if you can, rather than sliced.
Now you could easily make this into a stew if you don’t like soup for dinner. Just don’t add as much chicken broth and add more ham. And I suggest making this a day ahead as it really does get much better as it sits awhile. It’s amazing to me how just these three rather plain ingredients can have so much flavor when cooked together. Add some bread and a salad and you have dinner.


Ingredients:
1 onion, chopped fine
2 pounds potatoes, I like Yukon Gold, peeled and cut into chunks
bacon fat or olive oil for sautéing
about 4 cups chicken stock
2 bay leaves
2 tsp salt, 1/4 tsp pepper
1/2 tsp paprika
1/2 head large green cabbage, cut into strips
about 1 cup ham, cut into chunks or 2 or 3 strips bacon
Sauté the onion in a little bacon fat or olive oil, about a TBL, for a few minutes. Add the cut up potatoes and brown in the fat another few minutes.
Add the chicken stock, bay leaves, salt, pepper and paprika. Bring to a boil then add the cabbage. Bring to boil again and then turn down to a simmer and cook about 45 minutes.
While this is simmering, brown the ham in a little butter. Or cut the bacon into pieces and cook until crispy.
With a potato masher, smush a few potatoes to thicken the soup. Add the ham or bacon and also the drippings, then adjust the seasonings.
Don’t forget to remove bay leaves before serving.

Best enjoyed while looking out the window at the snow and ice!
Butternut Squash and Beef Chili
December 19, 2013 § 12 Comments

These cold and snowy days I like to have some kind of soup or stew on the stove simmering away. I have to, I have a man with a huge appetite who comes in after spending most of his days out in the weather. Having a farm, taking care of animals, chopping and hauling firewood burn up the calories mighty quick. Something warm and hearty is what he’s looking for!


I’d been putting off going shopping, not feeling like making the drive, so I didn’t have too much on hand in the fridge on this day. But I did have some ground beef and a couple of butternut squash. They keep just about forever thankfully, so are good to have around to make soup or this yummy chili. The rest of the ingredients are always in the kitchen, like onions, garlic, ‘canned’ tomatoes. (I don’t buy canned anymore, the BPA)
It’s the easiest recipe, really just a variation on my soup recipes. In fact, if you added a lot more stock to this you’d have soup. And you could add almost any vegetables to this, like some green or red peppers or cauliflower. Adding some spinach to it at the end is especially tasty.
Ingredients:
1 to 2 TBL olive oil or bacon fat
1 large onion, chopped
3 garlic cloves, minced
2 lbs ground beef, preferably grass fed
1 to 2 TBL chili powder, depends on how much you like
1 to 2 tsp cumin
1/2 tsp ground coriander
1/2 tsp ground ginger
1/4 tsp cinnamon
1 dried chili pepper, optional
1 large butternut squash, peeled and cut into chunks
2 cups tomatoes, either fresh or ‘canned’ ( I buy Bionature or Pomi)
broth, like chicken, beef or vegetable, homemade if possible
salt and pepper to taste
parsley or cilantro for serving
Sauté the onions in the oil until soft and translucent. Add garlic and cook another minute. Add the ground beef, breaking up with wooden spoon and cooking until it’s no longer pink. Add the spices, dried chili pepper, cut up squash, tomatoes and salt and pepper to taste. Add some broth, you want the squash to have some liquid to cook in. Bring to a boil, then turn heat down and simmer about 45 minutes or so, covered, until squash is soft. Taste for seasoning, then mash up a few of the squash pieces to thicken it up a bit.
Scoop some into a big bowl, top with sour cream, some chopped parsley or cilantro and you have a delicious warm lunch or dinner. Like most chili or stew, it’s even better the next day. You can serve this as is, or over rice or quinoa.

Illustration by me
Baked Lady Apples with Honey, Butter and Walnuts
December 8, 2013 § Leave a comment

These cute little apples were brought to our Thanksgiving dinner by my sister Sheila, and everyone was asking, what do you do with them? I’ve seen them in the markets and always wondered that myself. They’re a bit too small for regular eating, unless, like Sheila says, you just take a few dainty, lady-like bites!
We didn’t end up using them that day, and I’ve been looking at them sitting on my counter since then. Finally today they went into the oven. No recipe really, no measurements for these, they’re so easy, and I know you have all the ingredients already. Put them into the oven as you’re serving dinner and they’ll be ready when you’re done. Delicious with a roast pork! If you have any left over, have them for breakfast with a little yogurt.

Take the apples, hollow them out, being careful not to poke through. If you use a melon scooper it works pretty well. Fill with some unsalted butter, a bit of honey, a few chopped walnuts. Bake in a preheated oven, 350 degrees, covered with foil, for about 35 to 40 minutes, or until soft. Remove foil for the last 10 minutes or so.

You can change the ingredients of course, use maple syrup instead of honey, or even brown sugar. You can fill them with some jam, like apricot or red currant. Add cinnamon, or nutmeg, or change the nuts. You can top with ice cream, whipped cream or make them extra special with a custard sauce.
You’ll want about 2 or 3 per person.
